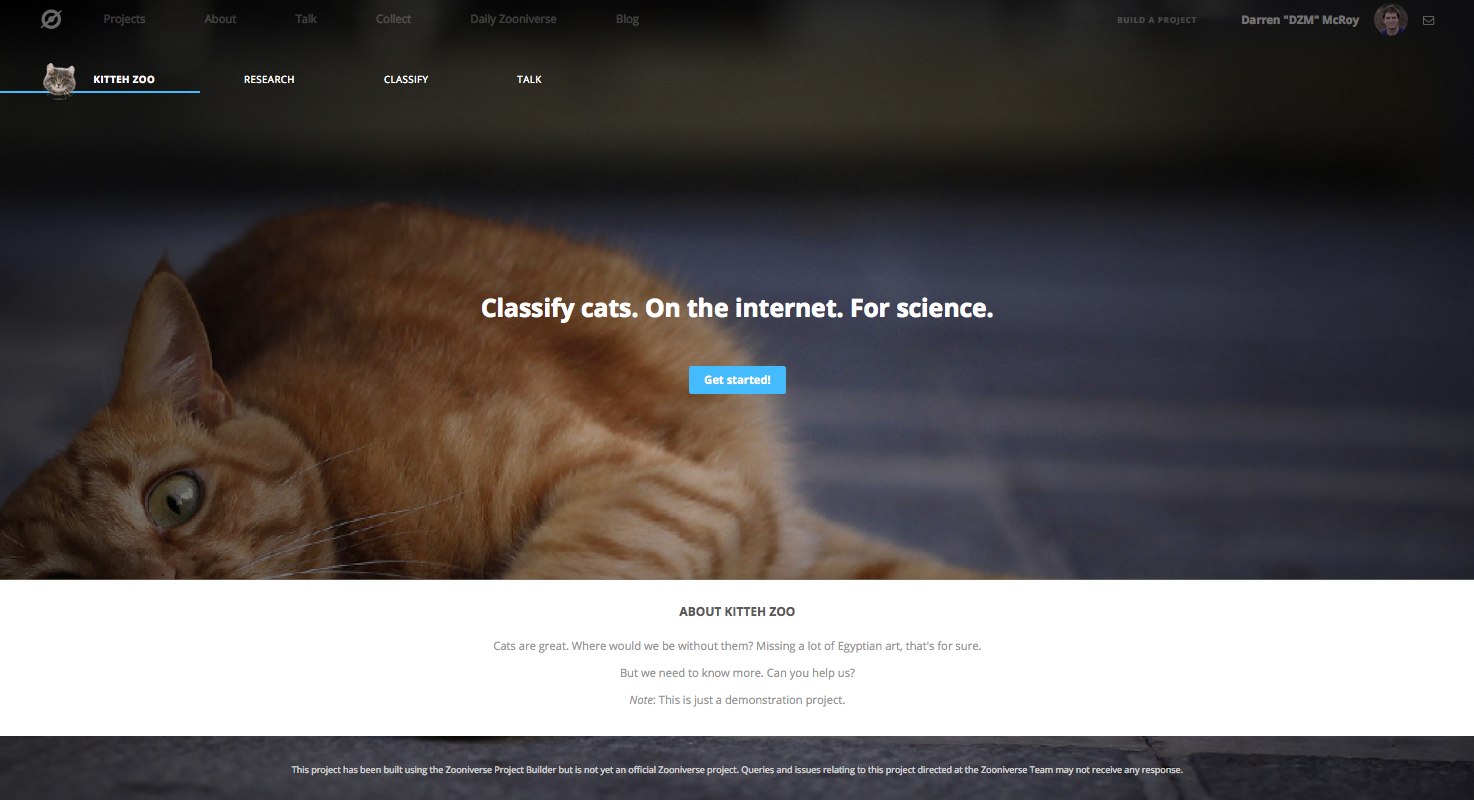
Example Project
So you want to build a project using the Zooniverse Project Builder? This tutorial will help walk you through the process, using Kitteh Zoo as an example. You can explore the actual project.
If you'd like to read more on strategy on building and running a project, such as what to plan for when building your project and what to do after launch, check out the Best Practices pages.
Getting Started
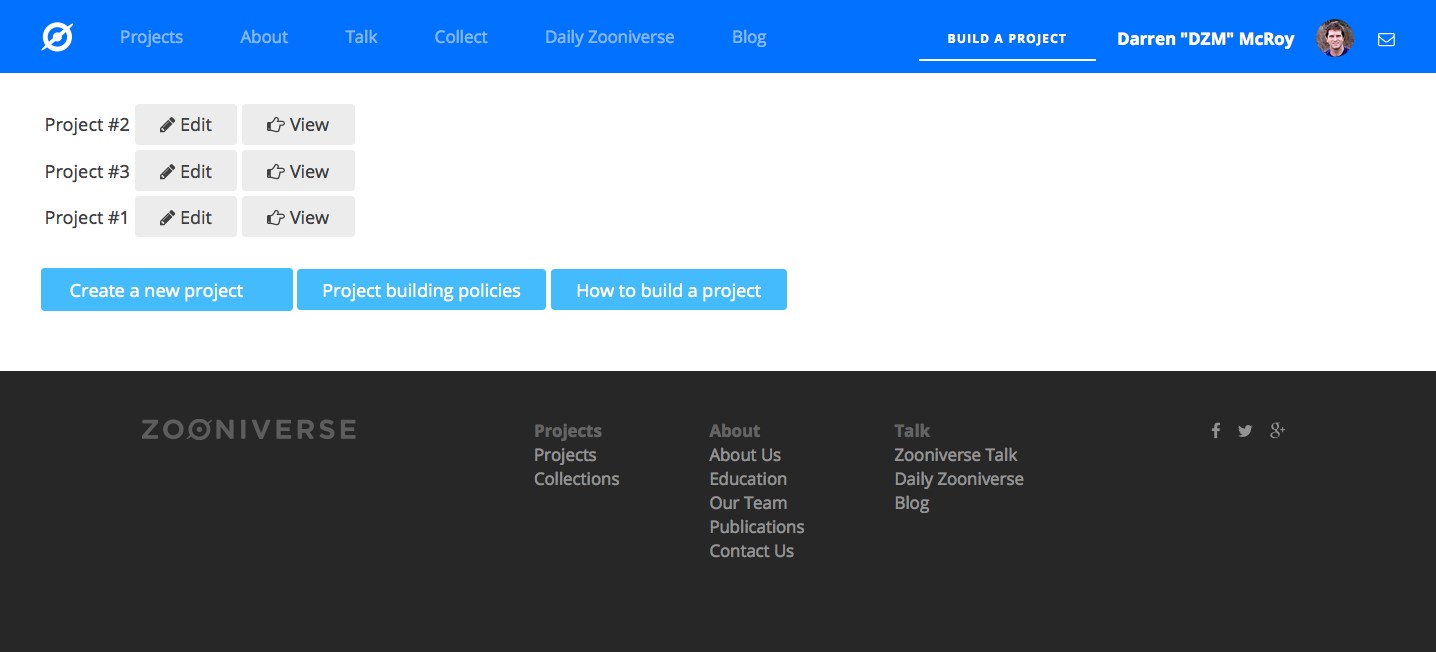
To get started building, go to the Project Builder home page and log in to your Zooniverse account, then click the "Build a Project" button in the top right. Here you can see all of the projects you own and collaborate on. Click on "Create a project" to start building.
Start building: Now you're in the Project Builder itself. This is where the magic happens. On the left-hand side, you've got your main menus: Project, Workflow, and Subjects. These are terms you'll see a lot, and they have specific meanings in the Zooniverse. Project is pretty self-explanatory; Galaxy Zoo, Penguin Watch, and of course, Kitteh Zoo, are all examples of Zooniverse projects that you could build using the project builder. A workflow is the sequence of tasks that you ask volunteers to do, and subjects are the things (usually images) that volunteers do those tasks on.
Define your project.
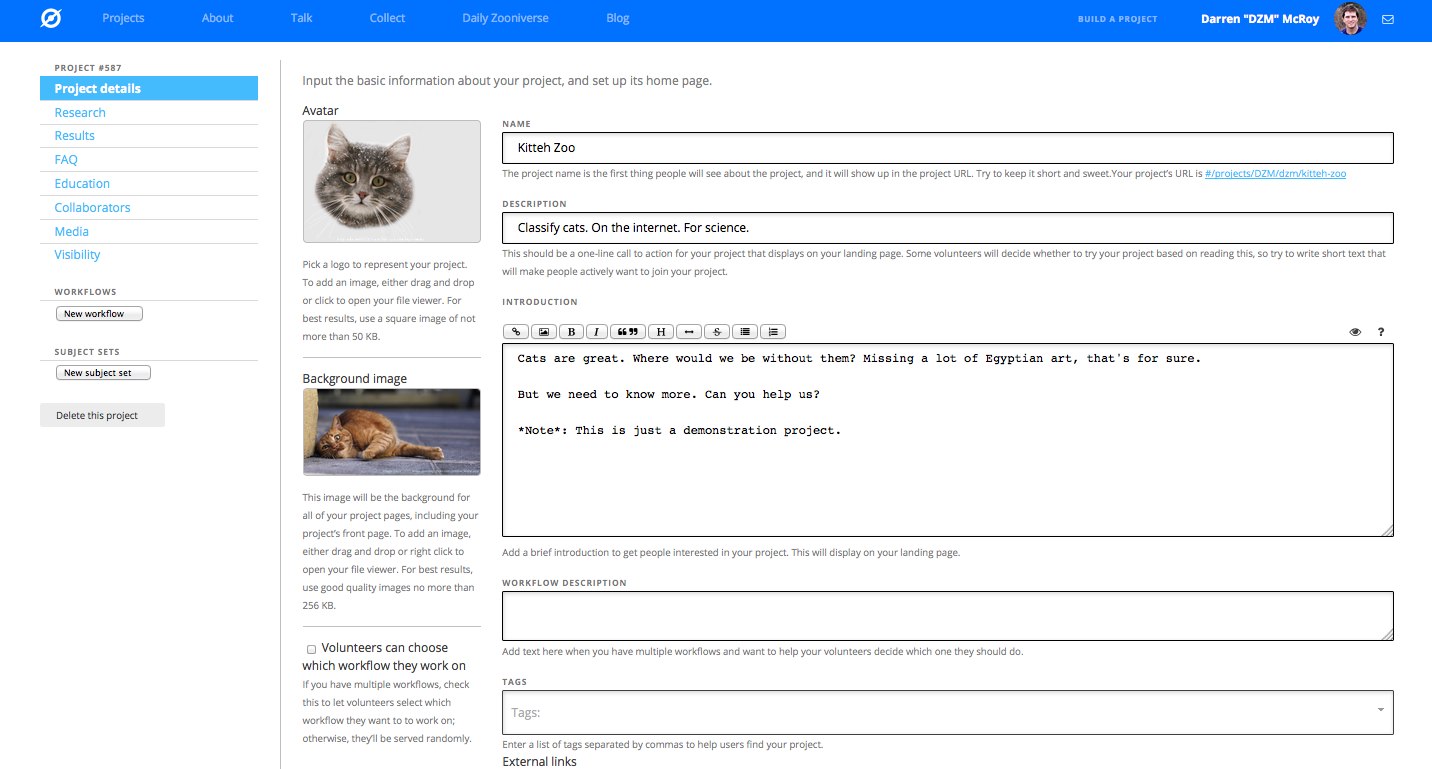
The first thing you'll want to do is fill in some basic information about your project on the Project Details page. Just click and type in the relevant boxes. We've added a short description that will be formatted using the markdown language. The avatar and background image for Kitteh Zoo are in this folder. Download these images to your computer. Now add these images by dragging and dropping or by clicking on the relevant boxes (like in the image above). You can come back and add more details at any time while building your project.
Building a workflow
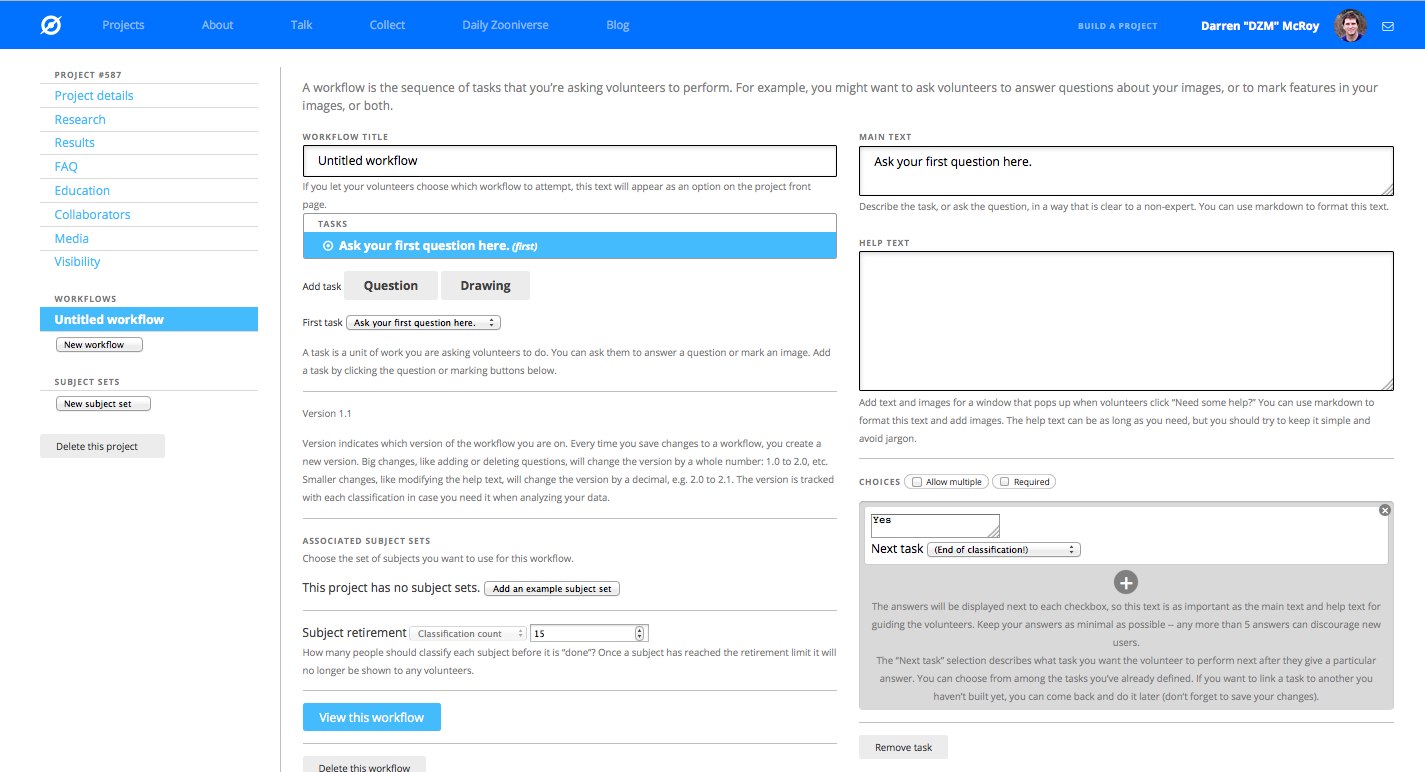
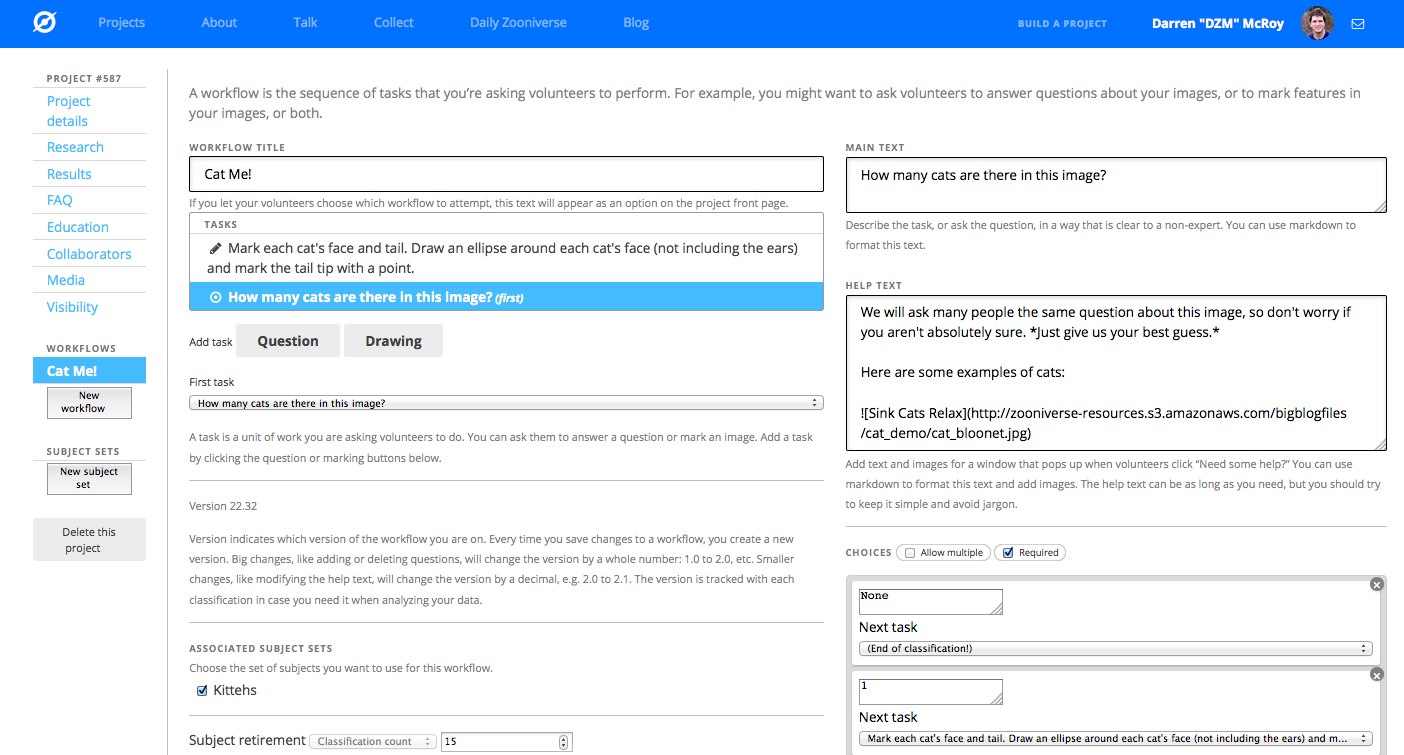
This is where you build the tasks that volunteers actually do. When you first get to this page, you'll see there is a sample task (specifically a question) already in place.
We want to create this:
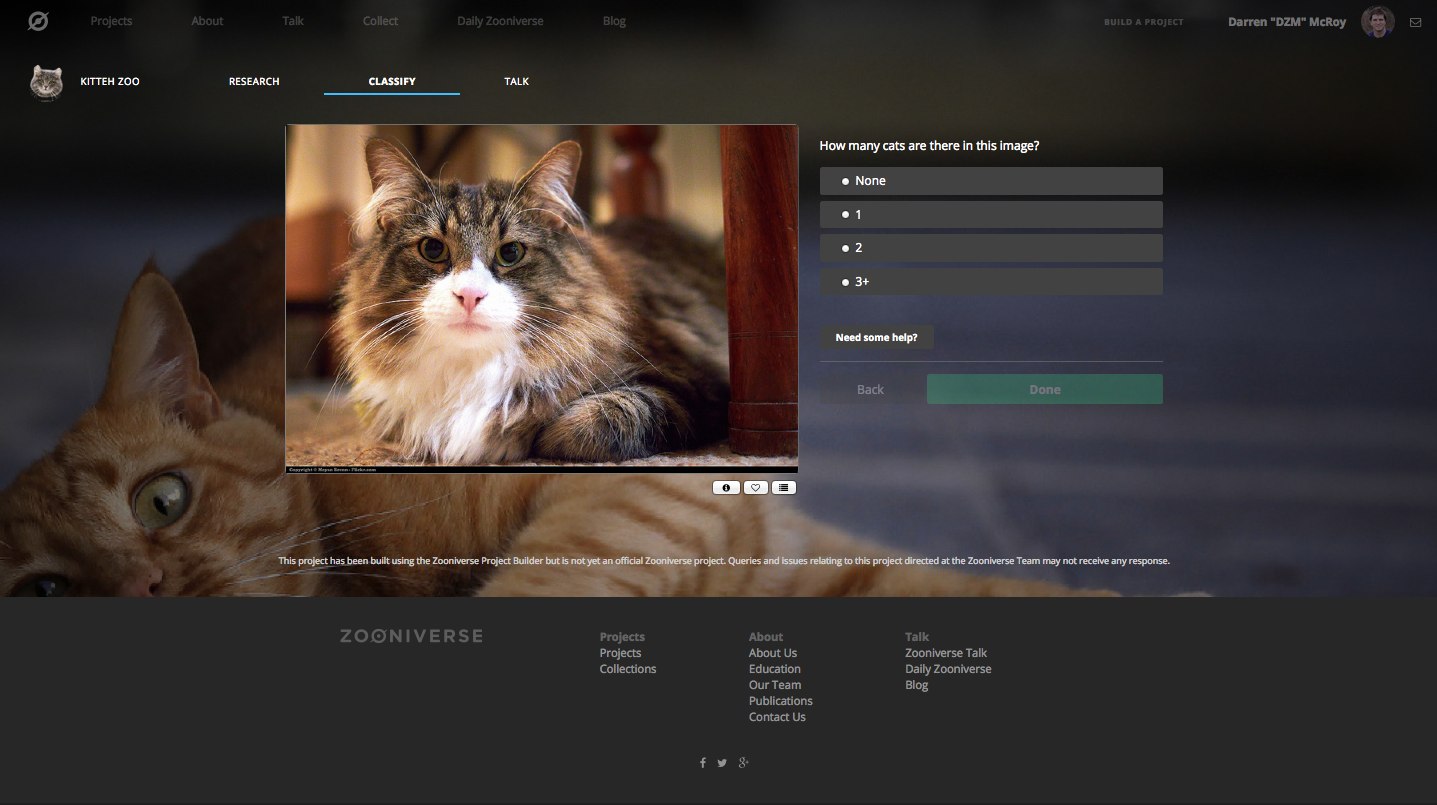
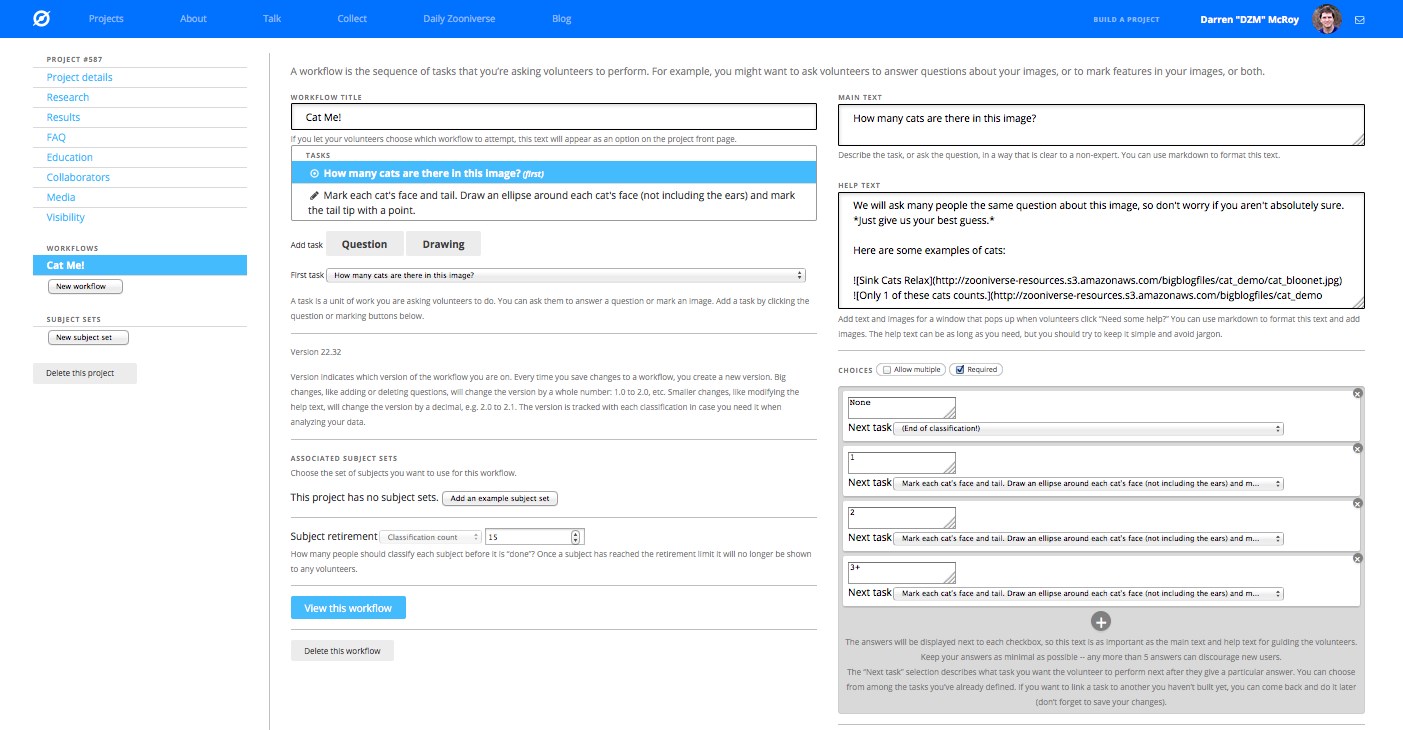
We'll start by replacing the sample text with our question, which asks people how many cats are in the image. We add more answers using the "+" button under the "Yes" answer. Use the screenshot below to fill in the workflow details (you may need to zoom in!)
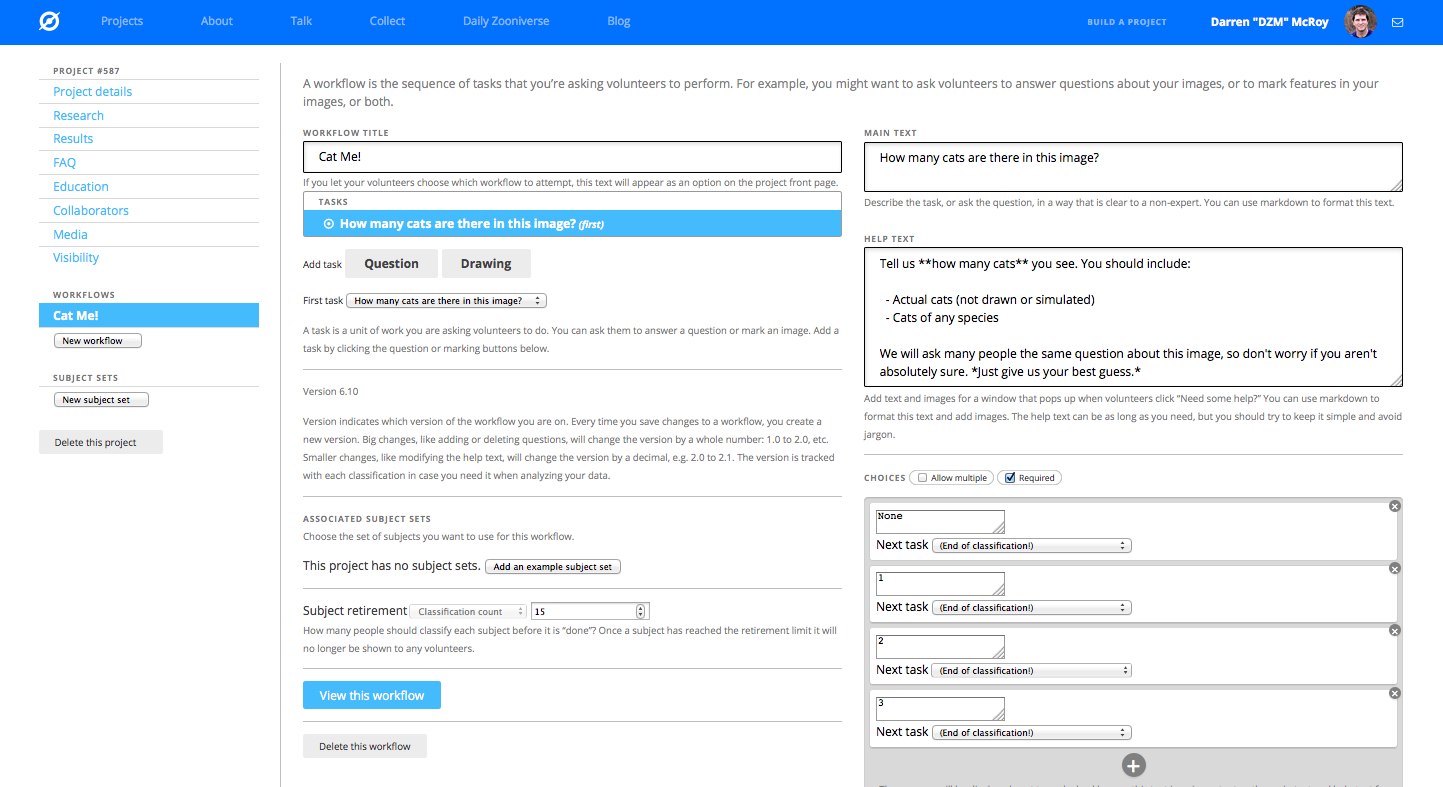
We added both text and images into the Help Text box using the markdown language (learn more about markdown).
Here is the markdown for the help text:
Tell us **how many cats** you see. You should include:
- Actual cats (not drawn or simulated)
- Cats of any species
We will ask many people the same question about this image, so don't worry if you aren't absolutely sure. *Just give us your best guess.*
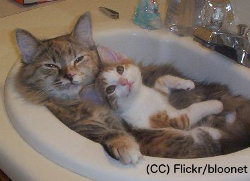
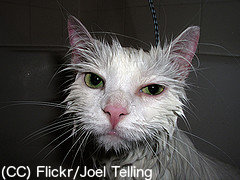
Here are some examples of cats:
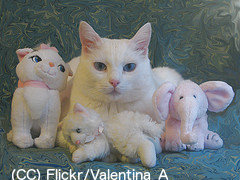
And here are some examples of not-cats (you can ignore these):

We can set subsequent tasks to depend on the answer to this question. Right now we haven't made any other tasks, so the only option is "End of Classification." Once we create more tasks, we'll go back through and link them. Note that this question is required (people can't move on until they've answered it) and only one answer is allowed.
Now we want to draw circles around the cat's faces and mark a point on their tails. Why? Because we can. (For your own project you'd obviously want to think carefully about the reasons for adding tasks to a workflow, and what you want to get from the answers/marks.)
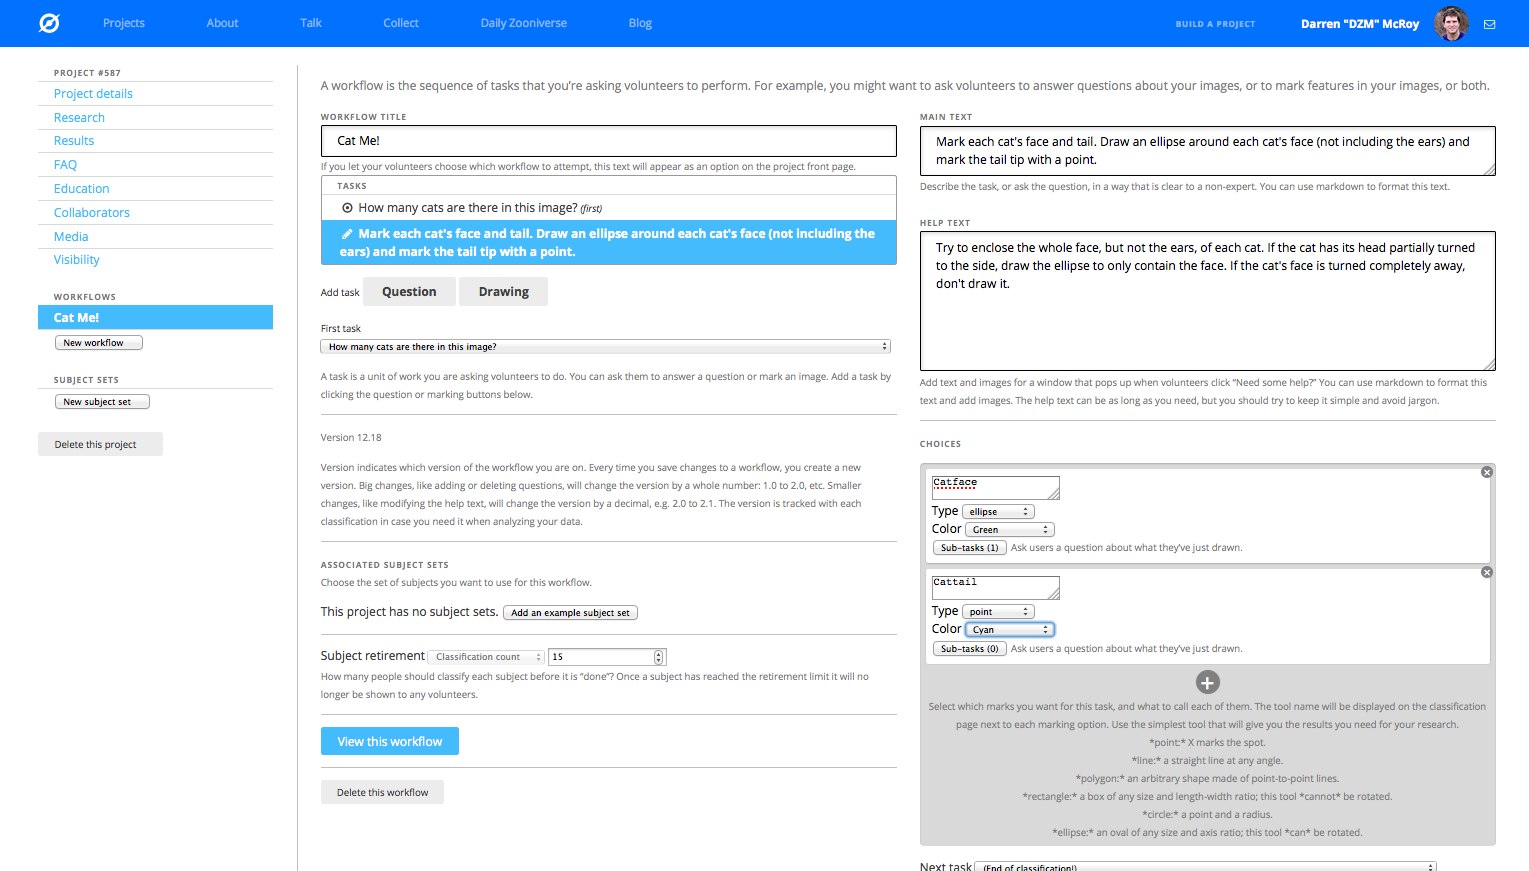
So under the Task list, we'll click on drawing. We're asking folks to draw (with ellipses) around the cats' faces, as well as mark their tail tips with a point. We've changed the color on the Cattail points so they stand out more too. As usual, the main text gives people basic instructions on what we want, and the help text provides some more explanation on how to do the task.
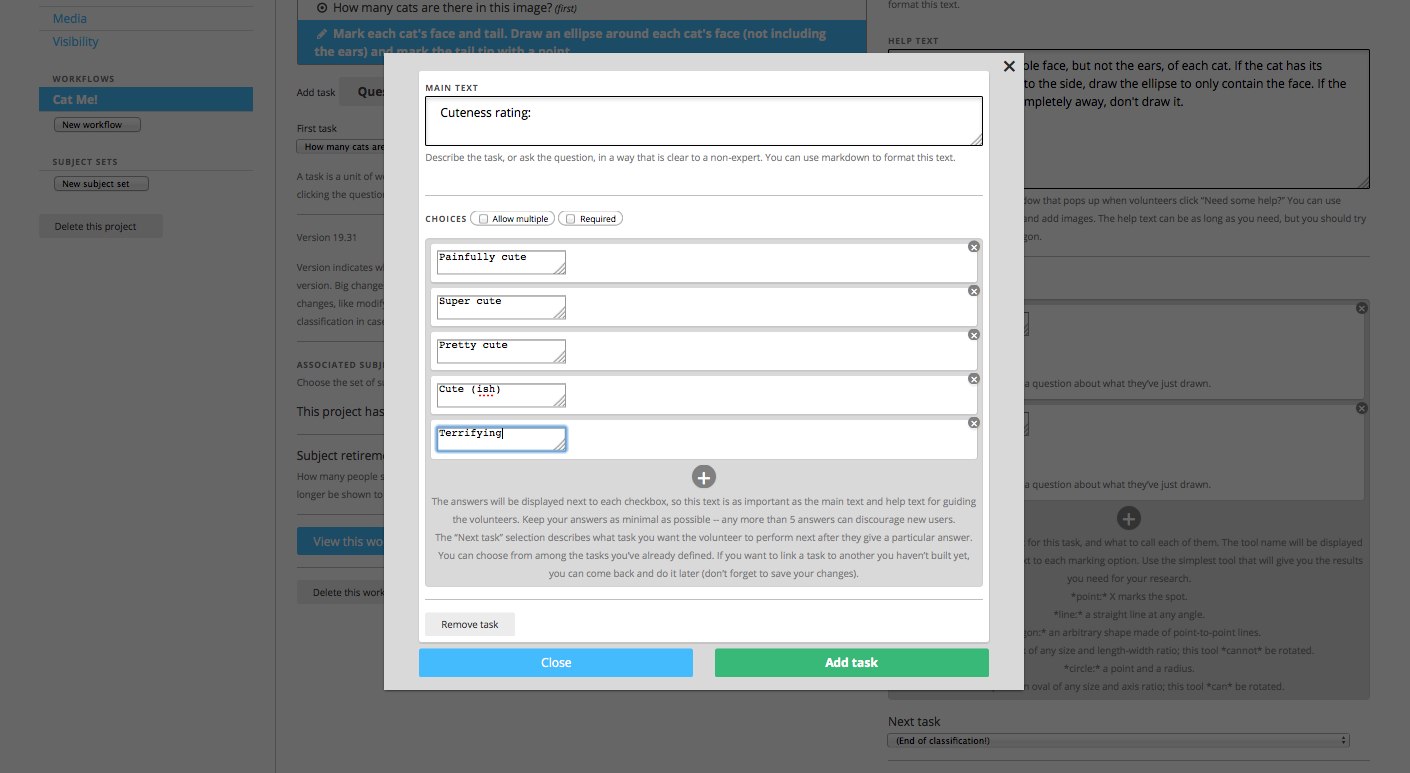
In addition to marking all the cat faces, we want to know just how cute they are. So every time someone marks a cat-face, we've added a pop-up question to ask just that. Add this question by clicking on the sub-tasks button below the Type and Color task specifications.
When building your own project, you can combine any number of tasks in any order. You can start with a drawing task instead of a question. You can add sub-tasks for any drawing tool you make.
In general, keep in mind that people are more likely to complete more classifications if the workflow is short and simple. Try to keep the workflow as simple as possible to achieve your research goals, and definitely try to only request tasks that cannot be accurately accomplished by automated methods.
Linking the workflow together
Now that all the tasks have been created, we've got to string them together by specifying what happens next. Right now, this means you kind of need to work backwards. The drawing task is the last task in this workflow, so we'll leave the "Next Task" button as the default "end of classification." But we'll have to go back to our first question.
The first question, "How many cats are in this image?" only allows one answer, so you can specify the next task depending on the answer. If folks say "None" for the number of cats, the classification ends. But if they say there's at least one cat, then they go on to the next question.
Upload subjects
To really get started building a project, you need images to work with. Normally you would add your own images by clicking on the "New Subject Set" button on the left hand side of the screen. This is one of the trickier steps in project creation -- for the purposes of this tutorial you can simply copy the Kitteh Zoo subject set, but check out the next section "Uploading subjects -- the nitty gritty" if you want to practice the full approach. To do this go to the workflow you created and under the associated subject set section click on add an example subject set. You should now see the 'kittehs' subject set selected.
CONGRATULATIONS!
You should have successfully created Kitteh Zoo! To view it, got back to the Build a Project page (by clicking the button in the top right of the page) and then click on the view button next to the new project you have just made.
Uploading subjects - the Nitty Gritty
When you actually build your own project, there won't be an example set of images already loaded for you. Get started uploading a set of subjects for your project by clicking on the "New Subject Set" button on the left hand side of the screen. That will bring you to the Subject Uploader.
If every subject you want classified is a single image, and if the image file name contains enough information for you to be able to precisely match the subject with the rest of your data later, then this is pretty easy: you can just drag and drop the images into the Subject Uploader (or click within the "Upload Subjects" box and choose the files in the pop-up menu) and it will automatically detect that it needs to make subjects out of each file.
Much of the time, though, project builders need to keep some data associated with their images in the classification interface. For example, in Kitteh Zoo all the images are Creative Commons licensed and need to have attribution attached when they are displayed. With a simple file called a manifest, we can associate the needed information with each image. Below you can find more details about the manifest in the section DETAILS - Subject sets and manifest details, a.k.a. "What is a manifest?" For now we will assume the manifest is created and the files are ready. You can see an example manifest file in the "Kitteh" zip file.
People often find it easiest to have all of the subject images in a single folder along with a manifest file; you will upload both at the same time. However you organize your files, pay attention to the details and keep records, as it may be important for your data analysis later (e.g. when you download your classifications of subjects and need to know how to correctly link those back to all the rest of your metadata).
Click on the "Upload Subjects" box and navigate to the "Kitteh" folder you downloaded. The easiest thing to do is simply hit cmd + a (on Mac, or ctrl + a on Windows) to select everything in that folder. Note that the subject uploader ignores the excel file and the other folders. Click "open" to select those images and the manifest file for upload. The project uploader now indicates that the "Cat project manifest.csv" has 30 subjects for upload. (If we had more subjects to upload, we'd do them in batches of no more than 1,000 at a time.)
Click "Upload" to start the process. When everything is uploaded, you'll see a list of all of the subjects. The numbers to the left are unique identifiers for each subject, and the icons to the right let you preview or delete each subject.
Subject sets can be pretty powerful, and sometimes complex. You can have a single subject set that you add to over time, or have multiple subject sets, say, from different years or places. You can have different subject sets for different workflows, but you don't have to. You can even have multiple images in a given subject. For more details and advice on creating and structuring subject sets and associated manifests, check out the details section below.
PROJECT BUILDER'S MANUAL – THE DETAILS
- Project: This holds all your project level details. The project name, the people involved, and all the extra content (e.g. text and pictures) you want to share, are all here.
- Project Details: This is your project's "behind the scenes" home page. Start off by naming and describing your project, add a logo and background image.
- Research Case, FAQ, Results, and Education: You can add a lot of information in these pages to help volunteers better understand the motivation for your project, the best approaches for classifying, and the outcomes of your project.
- Collaborators: Add people to your team and specify what their roles are so that they have the right access to the tools they need (including access to the project before it's public).
- Workflows: A workflow is the sequence of tasks that you're asking volunteers to perform. For example, you might want to ask volunteers to answer questions about your images, or to mark features in your data, or both. The workflow is where you define those tasks and set out the order in which the volunteers will do them. Your project might have multiple workflows (if you want to set different tasks for different image sets).
- Subjects: A subject is a unit of data to be analyzed. A subject can include one or more images that will be analyzed at the same time by volunteers. A subject set consists of a list of subjects (the "manifest") defining their properties, and the images themselves. Feel free to group subjects into sets in the way that is most useful for your research. Many projects will find it's best to just have all their subjects in 1 set, but not all: larger projects often find it essential to group subjects into multiple sets.
DETAILS - Workflows
Note that a workflow with fewer tasks will be easier for volunteers to complete. We know from surveys of our volunteers that many people classify in their limited spare time, and sometimes they only have a few minutes. Longer, more complex workflows mean each classification takes longer, so if your workflow is very long you may lose volunteers.
Workflow Name: Give your workflow a short, but descriptive name. If you have multiple workflows and give volunteers the option of choosing which they want to work on, this name will appear on a button instead of "Get started!"
Version: Version indicates which version of the workflow you are on. Every time you save changes to a workflow, you create a new version. Big changes, like adding or deleting questions, will change the version by the number to the left of the ".": 1.0 to 2.0, etc. Smaller changes, like modifying the help text, will change the integer to the right of the ".", e.g. 2.0 to 2.1. The version is tracked with each classification in case you need it when analyzing your data. Note: the version looks like a decimal number, but it is not: it is a string with two numbers separated by a "." character. So, for example, version 2.1 is not the same as version 2.10.
Tasks: There are two main types of tasks: questions and drawing. For question tasks, the volunteer chooses from a list of answers but does not mark or draw on the image. In drawing tasks, the volunteer marks or draws directly on the image using tools that you specify. They can also give sub-classifications for each mark. Note that you can set the first task from the drop-down menu.
Main Text: Describe the task, or ask the question, in a way that is clear to a non-expert.
The wording here is very important, because you will in general get what you ask for. Solicit opinions from team members and testers before you make the project public: it often takes a few tries to reach the combination of simplicity and clarity that will guide your volunteers to give you the inputs you need.
You can use markdown in the main text.
Help Text: Add text and images for a pop-up help window. This is shown next to the main text of the task in the main classification interface, when the volunteer clicks a button asking for help. You can use markdown in this text, and link to other images to help illustrate your description. The help text can be as long as you need, but you should try to keep it simple and avoid jargon. One thing that is useful in the help text is a concise description of why you are asking for this particular information. This help information often overlaps with information in the Field Guide, but it is an opportunity to provide extra detail about each specific task.
DETAILS - Project Details:
Name: The project name is the first thing people will see and it will show up in the project URL. Try to keep it short and sweet.
Avatar: Pick an avatar image for your project. This will represent your project on the Zooniverse home page. It can also be used as your project's brand. It's best if it's recognizable even as a small icon. To add an image, either drag and drop or click to open your file viewer. For best results, use a square image of not more than 50KB, but at minimum 100x100 pixels.
Background: This image will be the background for all of your project pages, including your project's front page, which newcomers will see first. It should be relatively high resolution and you should be able to read text written across it. To add an image, either drag and drop or click to open your file viewer. For best results, use images of at least 1 megapixel, no larger than 256 KB. Most people's screens are not much bigger than 1300 pixels across and 750 pixels high, so if your image is a lot bigger than this you may find it doesn't look the way you expect. Feel free to experiment with different sizes on a "typical" desktop, laptop or mobile screen.
Description: This should be a one-line call to action for your project. This will display on your landing page and, if approved, on the Zooniverse home page. Some volunteers will decide whether to try your project based on reading this, so try to write short text that will make people actively want to join your project.
Introduction: Add a brief introduction to get people interested in your project. This will display on your project's front page. Note this field (renders markdown)[http://markdownlivepreview.com/], so you can format the text. You can make this longer than the Description, but it's still probably best to save much longer text for areas like the Research Case or FAQ tabs.
Checkbox: Volunteers choose workflow: A workflow is a set of tasks a volunteer completes to create a classification. Your project might have multiple workflows (if you want to set different tasks for different image sets). Check this to let volunteers select which workflow they want to work on; otherwise, they'll be served workflow-subject pairs randomly.
Checkbox: Private project: On "private" projects, only users with specified project roles can see or classify on the project. We strongly recommend you keep your project private while you're still working out its details. Share it with your team to get feedback by adding them in the Collaborators area (linked at the left). Team members you add can see your project even if it's private. Once your project is public, anyone with the link can view and classify on it.
DETAILS - Additional Content
Research, FAQ, Results, and Education: These pages are where you really get to share all the cool things about your project. All of these pages use Markdown (see link above) to format text and display images.
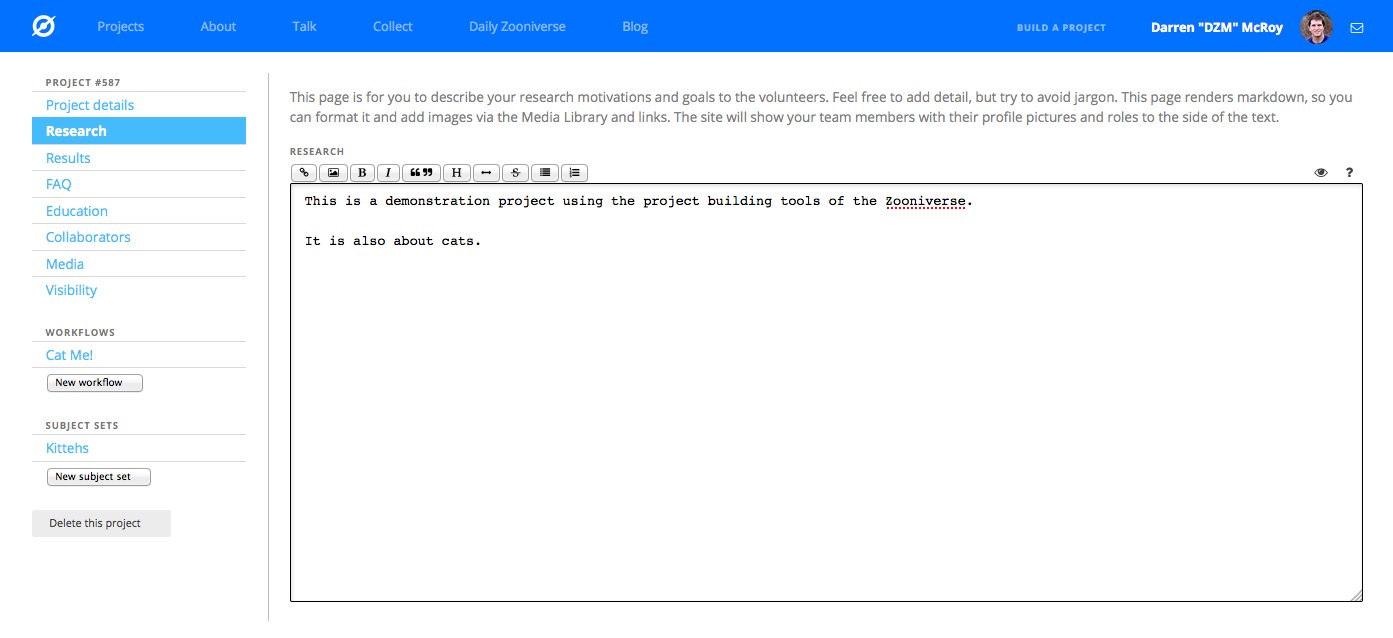
Research: Explain your research case to your audience here in as much detail as you'd like. This page displays no matter what, since explaining your motivation to volunteers is critical for the success of your project!
Results: Once your project has hit its stride, share the results of your project with your volunteers here. Volunteers really value feedback about how their inputs were used to help the research. This page will only display if you add content to it.
FAQ: Add details here about your research, how to classify, and what you plan to do with the classifications. This page can evolve as your project does so that your active community members have a resource to point new users to. This page will only display if you add content to it.
Education: If you are a researcher open to collaborating with educators you can state that here, include educational content, and describe how you'd like to help educators use your project. Also, if your project is primarily for educational purposes you can describe that here. This page will only display if you add content to it.
DETAILS - Media
You can upload your own media to your project (such as example images for your help pages) so you can link to it without an external host. To start uploading, drop an image into the box (or click it to bring up your file browser and select a file).
Once the image has uploaded, it will appear above the "Add an image" box. You can then copy the markdown text beneath the image into your project, or add another image.
DETAILS - Visibility
This page is where you decide whether your project is public and whether it's ready to go live. For more information on the different project stages, see our project builder policies.
DETAILS - Collaborators
Add people to your team and specify what their roles are so that they have the right access to the tools they need (including access to the project before it's public).
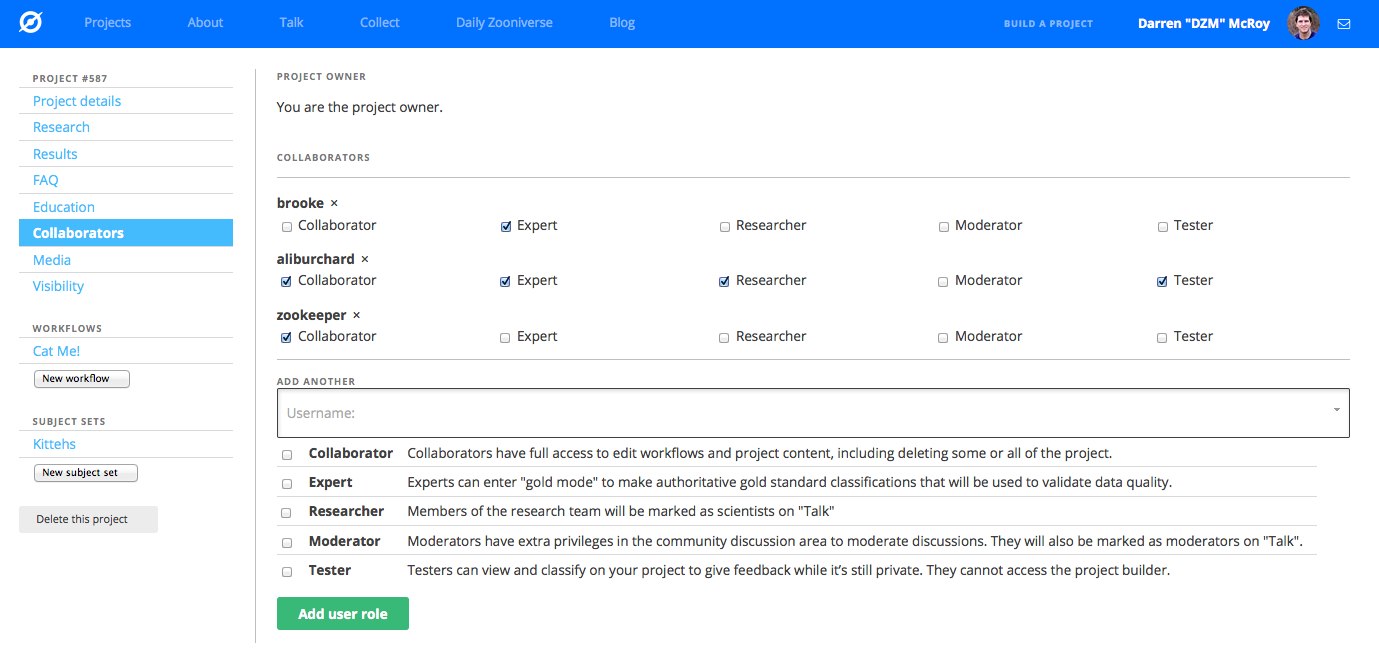
Owner: The owner is the original project creator. There can be only one.
Collaborator: Collaborators have full access to edit workflows and project content, including deleting some or all of the project.
Expert: Experts can enter “gold mode” to make authoritative gold standard classifications that will be used to validate data quality.
Researcher: Members of the research team will be marked as researchers on “Talk"
Moderator: Moderators have extra privileges in the community discussion area to moderate discussions. They will also be marked as moderators on “Talk".
Tester: Testers can view and classify on your project to give feedback while it’s still private. They cannot access the project builder.
Translator: Translators will have access to the project builder as well as the translation site, so they can translate all of your project text into a different language.
DETAILS - Subject sets and manifest details, a.k.a. "What is a manifest?"
The condensed answer:
A manifest is a file that tells our software how to combine the images you have into units of data (subjects) to be classified. The manifest also allows you to link your classifications back to the rest of your data. A manifest is formatted as a CSV file with 1 line per subject, with the names of images to be associated with a subject on each row (with additional information often included in other fields as well). There is an example in the "Kitteh" zip file.
The full answer:
What we call a "manifest" is really just a plain text file with a specific format to each line.
To understand the format, let's start with the first few lines from the Kitteh Zoo manifest:
image,!origin,link,attribution,license,#secret_description
6672150457_420d61007d_b.jpg,Flickr,https://www.flickr.com/photos/aigle_dore/6672150457,Moyan Brenn,Creative Commons - share adapt attribute,sleepy striped kitteh is unsuspecting of paparazzi
8300920648_d4a21bba59_z.jpg,Flickr,https://www.flickr.com/photos/aigle_dore/8300920648,Moyan Brenn,Creative Commons - share adapt attribute,grandfather kitteh has ear hair. a lot of it
6713782851_82fc8c73e5_z.jpg,Flickr,https://www.flickr.com/photos/hellie55/6713782851,hehaden,Creative Commons - share adapt attribute,juvenile kittehs practice break-in at the catnip factory
The first line of the file is a header line that specifies the name of each of the manifest fields. In this case, our manifest has 6 fields (or columns), called "image", "!origin", "link", "attribution", "license" and “#secret_description”. They are separated by commas: this is what's known as a "comma separated values" file, or CSV file.
After the first line, each row of the file contains information about 1 subject. The first field, which aligns with the "image" header, contains the name of the image that's associated with that subject. This field is critically important as it tells the project builder which images to make into subjects.
All the other fields are optional, but in general having more information in the manifest is better. Most projects include additional information in the manifest that helps them match the classifications and subjects to the other data they need for their research. For example, many projects include a separate ID that they have generated and which can be used later as a unique identifier to match classification data to their own metadata (for other projects, the unique identifier is the filename). The additional information in the manifest can also be made available to volunteers as they classify or in the Talk discussion tool (some very keen volunteers find this extremely useful). Any fields with names that begin with “#” or “//” will never be shown to volunteers, such as the “#secret_description” field in Kitteh Zoo. These hidden fields will still be returned to you in the classification file, so you can use these to include information helpful to your research without worrying about whether it might affect the classifications themselves. There might be information that could helpful for the volunteers in discussions or further exploration in the Talk discsussion tool, but could bias the classifications if visible to volunteers while classifying. Any fields with names that begin with "!" will not be accessible to volunteers in the classification interface, but will be available on Talk after classification (such as the “!origin” field above). Information in fields that don’t begin with a “#”, “//”, or '!' will always be accessible to volunteers in both the classification interface and the Talk discussion tool.
For now, let’s assume you’re just including minimal information, like:
my_own_id,the_image
1,kitteh_in_box.jpg
2,kitteh_stalking.jpg
3,kitteh_losing_balance.jpg
Note the field names have changed from the previous example. That's because, aside from marking whether a field is hidden or not, it doesn't actually matter to the Zooniverse what the fields are called (or what order they’re in), so you can name and order them according to whatever works best for your project.
Using a manifest CSV file also makes it very easy to create subjects with multiple images:
my_own_id,image1,image2
1,kitteh_in_box.jpg,kitteh_eating_box.jpg
2,kitteh_stalking.jpg,kitteh_pounced.jpg
3,kitteh_losing_balance.jpg,kitteh_falling_off_sofa.jpg
If you upload this manifest plus the 6 images named in it, the Zooniverse software will create 3 subjects with 2 images each. When these subjects come up in the classification interface, volunteers will be able to flash between the images or switch between them manually. Later on, when these subjects are classified, the subject_id assigned by the project builder can be used with a subject export to match each classification back to this information.
You can create a manifest file in a simple text editor (such as TextEdit or Notepad), although this method is prone to errors like missed or extra commas. People often find it easiest to create manifest files using spreadsheet software such as Google Sheets, iWork Numbers or Microsoft Excel. Creating and maintaining a manifest using a spreadsheet makes the manifest easy to read, and you can export it to CSV format when you're ready to upload your subjects. You can also open existing CSV files in spreadsheet software.
Note: if you have a large subject set it may be cumbersome to manually create a manifest. We suggest using a command-line or other tool to copy-paste a directory list of files into a spreadsheet to help you get started.